
JUMP TO KEY SECTIONS
Apple devices equipped with M1 M2 or M3 chips
M1, M2 or M3 MacBook Multiple Monitor Expansion
Challenges of Expanding Multiple 4K Monitor
Cost-effective Ways to Expand Dual 4K Monitors on Apple MacBook Air/Pro
How to set up dual 4K 60hz displays on M1, M2, or M3 Apple MacBook?
Conclusion
Apple devices equipped with M1 M2 or M3 chips
The following devices currently use Apple's M1, M2, or M3 chip:
MacBook Air(13.3-inch, M1, 2020)
MacBook Pro(13-inch, M1, 2020)
Mac Mini(M1, 2020)
iMac(24-inch, M1, 2021)
MacBook Air(13-inch, M2, 2022)
MacBook Pro(13-inch, M2, 2022)
iMac(24-inch, M3, 2023)
MacBook Air(13-inch, M3, 2023)
MacBook Air(15-inch, M3, 2023)
MacBook Pro(14-inch, M3, 2023)
M1, M2 or M3 MacBook Multiple Monitor Expansion
Are you using an Apple MacBook Air/Pro equipped with the latest M1, M2, or M3 chip and looking to extend your display with a dual monitor setup or multiple monitors to optimize your workflow and boost productivity? This article will discuss the challenges M1, M2, and M3 MacBook users may face when trying to connect multiple 4K external displays, and provide two cost-effective solutions to help you easily overcome the display limitations of Apple's M1, M2, and M3 silicon - enabling an extended multi-monitor macbook setup.
Challenges of Expanding Multiple 4K Monitor
A study by the University of Utah and Wichita State University found that using dual monitor setup can reduce work errors by 20%, increase job satisfaction by 91%, and decrease work stress. This means that MacBook users can significantly improve their productivity and work efficiency by extending their display across multiple monitors. Apple's latest M1, M2, and M3 MacBook Air/Pro models excel in performance and portability, they still face some limitations in connecting external monitor.

On Reddit and forums, we often see Macbook users asking: Why don't the M1, M2, or M3 chip-based MacBooks support 2 or more external displays? The reason is that the M1, M2, or M3 chips only have two display output engines, with one always used for the internal display, and therefore they only drive one additional external monitor. This display limitation can cause inconvenience for MacBook users who need to multitask across multiple applications and resources simultaneously for tasks like photo/video editing or programming. So,how to extend display on macbook?
Cost-effective Ways to Expand Dual 4K Monitors on Apple MacBook Air/Pro
Even though Apple MacBook Air/Pro models may sometimes experience issues with macbook not recognizing external monitor due to certain hardware limitations in connecting external monitors, there is a cost-effective solution to enable a dual 4K monitor setup or multi-monitor display expansion - by leveraging DisplayLink technology.

The principle behind how DisplayLink technology enables multi-display output on M1 is similar to the built-in Sidecar feature in macOS. It simulates external display devices through the processor, compresses the image, and then outputs the video signal through the USB interface to the adapter, where the DisplayLink chip decodes and converts it for the HDMI output to the display. As long as your MacBook supports DisplayLink drivers, you can easily add extra screens or extend your desktop up to 6 displays total. However, if you want to achieve 4K 60Hz display quality, you'll need to ensure that the selected DisplayLink device and the USB port you use support USB 3.0 or higher.
For users with a limited budget who need to achieve a 4K 60Hz dual-screen extension on an Apple MacBook Air/Pro, the ACASIS 4K Display USB C to Dual HDMI Adapter with DisplayLink priced at $64.9 is the most cost-effective choice. This adapter utilizes DisplayLink technology to ensure smooth and high-quality display output.
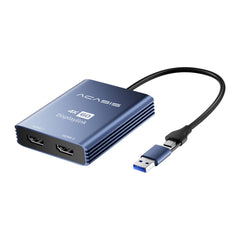
ACASIS Dual 4K 60Hz USB-C to HDMI Adapter for M1, M2, or M3 MacBook
If your budget is more flexible, and you require a solution that can not only support multi-screen expansion but also provide interface expansion, you may want to consider the ACASIS Dual 4K HDMI 13-in-1 USB C Hub.
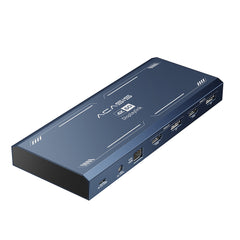
Acasis 13-in-1 Dual 4K HDMI USB-C Hub for M1, M2, or M3 MacBook
This 4K HDMI adapter is equipped with DisplayLink mac software, allowing you to not only connect two 4K 60Hz external monitors, but also provides a wealth of additional ports and features. By using this device, you can easily extend your desktop across multiple displays while gaining 3 x 10Gbps USB-A ports, a 1000Mbps Ethernet port, a 3.5mm audio jack, a 100W PD port, as well as an SD card and a TF card reader. This comprehensive port layout effectively overcomes the limitations of the M1, M2, or M3 chips, whether you need interface expansion or screen expansion, it can fully meet your requirements.
How to set up dual 4K 60hz displays on M1, M2, or M3 Apple MacBook?
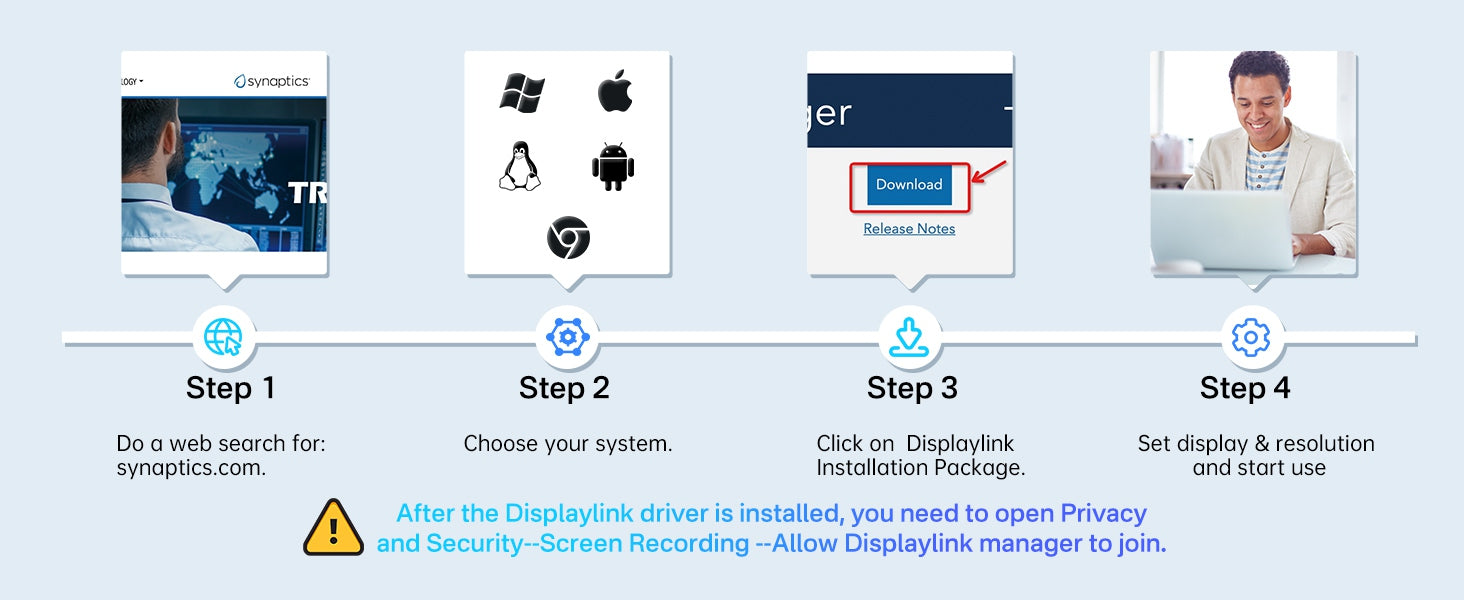
1. Open the DisplayLink official website and download the latest version of the Mac DisplayLink driver.
2. After the download is complete, locate and double-click the file, then follow the on-screen instructions to complete the installation.
3. After the installation, you may need to grant DisplayLink some necessary permissions in the system settings:
- Open System Preferences and click on "Security & Privacy".
- In the new window, click on the "Privacy" tab.
- In the left-side list, find and click on "Screen Recording", then click on the lock icon in the bottom right to unlock the settings and enter your administrator password.
- In the list of applications, find and check the box for DisplayLink Manager to allow it to access screen recording.
4. After the authorization is complete, you may need to close and reopen the DisplayLink Manager for the new settings to take effect.
With the above steps, you can successfully install the DisplayLink driver on your M1/M2/M3 MacBook and enable the expansion function to connect 4K 60Hz external displays.
Conclusion
Expanding multiple 4K Monitors on M1, M2, or M3 MacBook Air or MacBook Pro does not have to be complex or expensive. With the cost-effective ways we mentioned earlier, you can easily overcome Apple's limitations and improve your work efficiency and workflow. Whether you choose the budget-friendly DisplayLink-equipped Dual 4K 60Hz USB-C to HDMI Adapter or DisplayLink-based Dual 4K HDMI 13-in-1 USB C Hub, you can leverage these economical and efficient methods to fully unleash the potential and performance of your Apple M1, M2, or M3 MacBook Air/Pro, elevating your user experience to new heights.
Have you also encountered challenges in expanding high-resolution multiple monitor on your M1, M2, or M3 MacBook Air/Pro? Feel free to share your experiences and insights in the comments below. We'd be happy to hear how you've dealt with the limitations of the M1, M2, or M3 chips, and whether these solutions have been helpful to you. Your feedback will assist us in providing valuable recommendations for more users.


